Showing posts with label beauty. Show all posts

Friday, June 27, 2014

All About My Hair!

I always get questions about my hair. Let me tell you though, it took me four years to grow my hair out when I cut it at my ears. Yes, it was the worst mistake of my life. Recently, I just cut quite a bit off. Here's a before and after. 


My hair was at my hips and just a little out of control and too much for summer so I decided to cut some off a couple days ago. I'm still getting used to it and still a little sad but it's super healthy and a lot more manageable. 


Here's a quick rundown of the steps I've taken to keep my hair long and healthy:


Growing It Out

Growing my hair out, I hardly cut it. My hair is dark so when I had dead ends it was noticeable since they're white. I tried to get a trim every six months and only trimmed the smallest amount. 

Coloring My Hair

I don't. I would box color my hair darker but stopped two years ago. The beginning of this year I tried to go lighter but I didn't like it so I went back to my natural color. Not coloring your hair will keep it a lot healthier than if you do. Embrace your natural hair color!

Washing My Hair

I only wash my hair twice a week. Yes, only twice. If you wash your hair every day you're stripping your natural oils. Think of your hair like clothes, if you wash the same blouse every day it's going to end up looking dull and falling apart. It's the same thing with your hair. Because of the climate where I live, my scalp sometimes becomes dry. So I'll use T-Gel from Neutrogena to control that and it works really well. It's tar, so it smells like tar which isn't pleasant but after a few washes you get used to it. I'll only use that if it's a little out of control though. I'll usually wash my hair on Sunday and Thursday. On Sunday I'll shampoo (twice) and then use the Macadamia Natural Oil Hair Masque. I usually leave the masque on for 30-45 minutes. I'll put my hair in a bun on my head and just watch tv or something. If you want a more intense repair you can always put a shower cap on. Then on Thursday I'll just shampoo (twice) and condition normally.


FYI: If you're using a sulfate-free shampoo, which are better for you, it won't lather up as well. Some do though. But rule of thumb, if you're using a regular shampoo and it doesn't lather up, it means your hair is still dirty and you need to shampoo again. That's why I shampoo twice regardless.

After Washing

When I get out of the shower I put my hair up in a towel for about 15 minutes. Then I'll go in and spray It's a 10 or Sexy Hair Soya 22 in 1 and comb it through with a wide tooth comb. I'll then use Macadamia Natural Healing Oil on my ends. I almost always let my hair air dry. 


TIP: ONLY use a wide tooth comb when combing your hair when it's wet. Your hair is extremely fragile when it's wet so if you take a brush and brush through it you'll pull your hair out. 

Using Hot Tools

If I do blow dry my hair I'll use a blow-dry heat protectant. I use either use Redken's Prepping Blow Dry Lotion or Kenra's Blow Dry Spray. If I'm going to be curling or straightening my hair, I'll still use another heat protectant. I used Got 2 Be Guardian Angel and I liked it. I switched to Paul Mitchell's Hot Off the Press and Kenra's Hot Spray though. My straightener goes to 450* but I only use it at 410*. 

Oily/Greasy Hair

Because I only wash my hair twice, it does get somewhat oily. Dry shampoo will be your best friend. Most dry shampoos have a white cast which sucks for people who have dark hair like myself but don't fear, Batiste actually has one for dark hair. It also has a dark tint to it so you won't look like you have dandruff. Dry shampoo will also give you texture to help style it. 


*All the products mentioned can be purchased at Target and Ulta Beauty!


From my healthy hair to you,

Amanda :)

Wednesday, June 18, 2014

Waxing!

Let's talk about waxing. Wait, what did she just say? Yes, waxing that unwanted hair. At one point in your life I'm sure you wondered how painful it is. Well I'm here to give you the honest truth and what I use. 

Waxing can cost a pretty penny depending on what you're getting waxed and how often you need to have it done. A Brazilian wax alone can cost anywhere from $60-$75. Then if you want your eyebrows, armpits, legs, etc. done, you'll leave spending at least $150 if not more. That just wasn't something I was okay with spending. So I went to the Internet and started searching for at-home wax kits. It was either the cream wax or the hard wax.

There were positive and negative reviews on EVERYTHING just like there always is. I ended up going with the Gigi Brazilian Waxing Kit on Amazon that used hard wax. I crossed my fingers and hoped for the best. 


Alas, it arrived and I opened it up. Contents included were: 
- Wax Warmer
- Brazilian Body Hard Wax (14 oz)
- 10 Large Accu-Edge Applicators
- 10 Small Accu-Edge Applicators
- 10 Petite Applicators
- Pre-Epilation Oil (2 fl oz)
- Post Wax Cooling Gel (2 fl oz)
- Professional Brazilian Hard Wax System DVD

Everything was there and nothing was damaged. So I started the warmer and popped in the DVD. Just a forewarning, if you're not okay seeing a va-jj (vagina), then skip the DVD. It's a demonstration on how to use it with an actual client to show. I watched it and it didn't really help me. Youtube videos was how I ended up figuring it out.

I checked the wax and it was warm enough so I went to my armpits. I hate that word armpits, does anyone else? Anyway, I used the oil and made sure to wipe it away with a paper towel. I then took some baby powder and put it on to soak up any excess oils. I slabbed some of the wax on and let it cool. I tried to lift it with my fingernail and because that skin is so sensitive it looked like I either had a bruise or a hickey on my pit from trying to lift it. I have a fairly high pain tolerance level having gotten tattoos and piercings so I didn't expect it to hurt too much. I counted to three in my head and pulled. HOLY SHIT it hurt! I had put some wax on another section and I didn't even want to pull it off. And forget doing the other side. 

I sucked it up though and I did the other section and the other arm too. It hurt just as much but I couldn't have one smooth pit and not the other. That's not cute. It worked really good. It pulled the hair out from the root. You don't realize how much hair you have until you wax it and see it all on the strip. It's pretty gross. 

After I finished my arms I figured I'd give my legs a whirl. It hurt but it didn't hurt as bad. However, I don't recommend a hard wax for legs. It may just be my and my sister, because I tried it on her too, but it didn't grab on to our leg hairs. It would've taken hours to wax both and get everything if we would've kept trying. So that was a bust. 

However, my armpits stayed smooth for 3 weeks. So was waxing them and the pain endured worth it? Hell yes. When I went to do it again, it hurt so much less. I thought, well let me use this kit how it was intended to be used, on my va-jj. Now I was scared shitless, don't get me wrong. 

I prepped and was ready to go. I put a layer on the top part, under your bellybutton, and let it cool. I was not mentally prepared for this one. I pulled and it hurt worse than my armpit and I didn't think that was possible. I realized I needed to go in small section because it was just too much for me. I ended up only doing the top part and that was it. Forget anything else, it was too painful. But it stayed smooth for three and half weeks. Worth it? Yes.

I decided to give it another shot and do everything. This time I took two Advil to help with the pain. The top didn't hurt nearly as bad. I don't know if it was the Advil or my self talk but the rest didn't hurt too bad. Towards the inner parts, it's way more sensitive so it was unpleasant but tolerable. 

I love this kit. I eventually ran out of sticks so I ordered a box of 350 in different sizes for $10. The hard wax refills are between $10-$12 on Amazon and I've reordered those as well. Once you do it the first time, the next time is so much easier and a lot less painful. Waxing for me is a way of life now. I feel a crap ton better and cleaner haha. You seriously can't beat the price either. It's weird at first but you eventually get the hang of it and the temperature down right. Try waxing, I bet you won't go back!

From my smooth pits to you,
Amanda :)

Thursday, June 12, 2014

Get Ready With Me | Red Lip

Here's a makeup look featuring a bold red lip, I hope you enjoy! Below is the step by step process I used when creating the look to better help with what exactly I did. <3


Foundation and Concealer:

I used Philosophy's Hope in a Jar to moisturize after showering before starting the video. With summer and the heat a primer is pretty essential plus it helps even out my skin tone. For this video I used Benefit's Porefessional. I mixed Loreal True Match Foundation in shades W2 and W3 together on the back of my hand and applied it with a Beautyblender sponge. I went in with Mac's Pro Longwear Concealer in NC15 as a concealer and highlighter and applied it under my eyes, along the bridge of my nose, cupids bow, and forehead and blended it out with the Beautyblender. To set the concealer I used Mac's Prep + Prime Finishing Powder with an Elf blush brush.

Eyebrows:

I'm not going to lie, I suck at doing my eyebrows. I don't have the technique down and quite frankly I'm a little lazy but I did what I could for the video. I used Anastasia Beverly Hills' Brow Wiz in Brunette. Since I bought mine I guess they've changed the name to Dark Brown instead of Brunette. I went over and sort of set that with Whitening Lightning's Brow Bar to Go. After the video I used the wax in the brow bar to keep my unruly brow hairs down, haha. Anyway, moving on to eyes.

Eyes:

I only used one palette for this video and that was the Lorac Pro Palette. I kept the eyes simple since I was doing a bold red lip. A bold eye and bold lip clashes with each other. You usually end up looking like a clown. I took Taupe in palette with a Sigma E40 and put it in my crease. I then took Lt. Bronze on a Sigma E55 all over the lip. It's one of the shimmer colors in the palette but it's a very subtle shimmer. I then took Mauve on a Mac 217 and pushed it in the outer corner and up into the crease just to give a little definition in the eyes. Then I took that same E40 and blended everything out.

Face: 

I contoured my face with Nars Lagoona Bronzing Powder using a Sigma F05 brush. I hit the hollows of my cheeks, forehead, chin and dragged it onto my neck. I used my favorite blush, Mac's Melba on my cheeks. It's just the perfect neutral shade. I wear it year round. I'm staring at my hand since I just swatched it and the main color that I see is peach but a nudey peach. Anyway, I used a Bhumi blush brush to apply it on the apples of my cheeks. I took my Sigma F50 Duo Fibre brush to blend everything out and make sure there were no harsh lines. And to give a pretty glow I went in with Mac's Soft and Gentle Mineralized Skinfinish as a highlight on my cheek bones and cupids bow.

Eyelashes:

I curled my lashes with Japonesque's Eyelash Curler. This curler is the bomb. I've tried drugstore and the Mac one and this one is better than all of those. I did one coat of Loreal's Telescopic Shocking Extensions Mascara, the waterproof formula, because using waterproof before your regular mascara can help make the lashes look fuller. I then used Loreal's Telescopic Carbon Black Mascara and coated my top and bottom lashes. And finally, this wasn't in the video, I finished it off with Too Faced Better Than Sex Mascara. I know, it's a lot of mascara but I'm not a false eyelash wearer so I do what I can to make my lashes look long and full as if I were wearing falsies. 

Lips:

Before the video I put on Maybelline's Baby Lips lip balm to make sure they were moisturized. I used Rimmell's Scandeleyes Kohl Pencil in Nude as a lip liner. I used it as a base around my lips and because it was nude, it acted like a concealer so the color wouldn't bleed throughout the day. I took Mac's Myth lipstick and put it in the middle of my lips because I wanted it to be a little lighter since the red we're about to go in with is VERY red. Now for the big mamajama is Mac's Russian Red lipstick. 

For the final touch, I locked in my makeup with Urban Decay's Chill Setting Spray. And boom, we're done!

By the way, my hair is three day old hair. I sprayed it with Batiste Dry Shampoo before filming and combed it through. It's always a mess so don't pay any attention to it haha.

I hope you enjoyed it! If you have any suggestions, leave them in the comment section either here or on the video! Oh, and I tried to find links to all the products. Loreal and Rimmell are drugstore brands so you can find them at any drugstore, Target, Rite Aid, etc.

Thank you!
Amanda :)


As a disclaimer: I did not make the music I put to the video. 
Picture Perfect - dFonz
Seth is a good friend from high school and his music is amazing. Picture Perfect is one of my all time favorite songs. I listen to it at least once a day. If you like it, you should check out his Soundcloud and Youtube -> soundcloud.com/dfonz and youtube.com/sdfonz
Do It Like A Dude - Jessie J
Classic - MKTO  

Equipment: Macbook Pro
Edited on: iMovie


Monday, May 19, 2014

Get Ready With Me | Fast Forward

I was about to get ready when I had this bright idea to roll my Macbook and film it. When the baby is sleeping, I sometimes get bored. Haha. Here's my first ever video and post on YouTube! Apologies in advance for the poor lighting and everything else. I'm not a pro and I used iMovie to edit. Don't forget to upgrade in HD!

Hope you enjoy! 


Products Used:

Benefit Porefessional
Loreal True Match
Mac Pro Longwear Concealer
Mac Prep + Prime 
Rimmel Stay Matte Pressed Powder
Mac Melba 
Nars Lagoona
Lorac Pro Palette 
Whitening Lightening Brow Bar to Go
Anastasia Beverly Hills Brow Wiz
Too Faced Perfect Black Liner
Loreal Telescopic Mascara
Too Faced Better Than Sex Mascara
Eos
NYX Butter Gloss in Maple Blondie
Mac Fix+ 


Happy Monday,
-Amanda :)

Wednesday, May 14, 2014

Buxom Nudes and Brights

Hi guys!

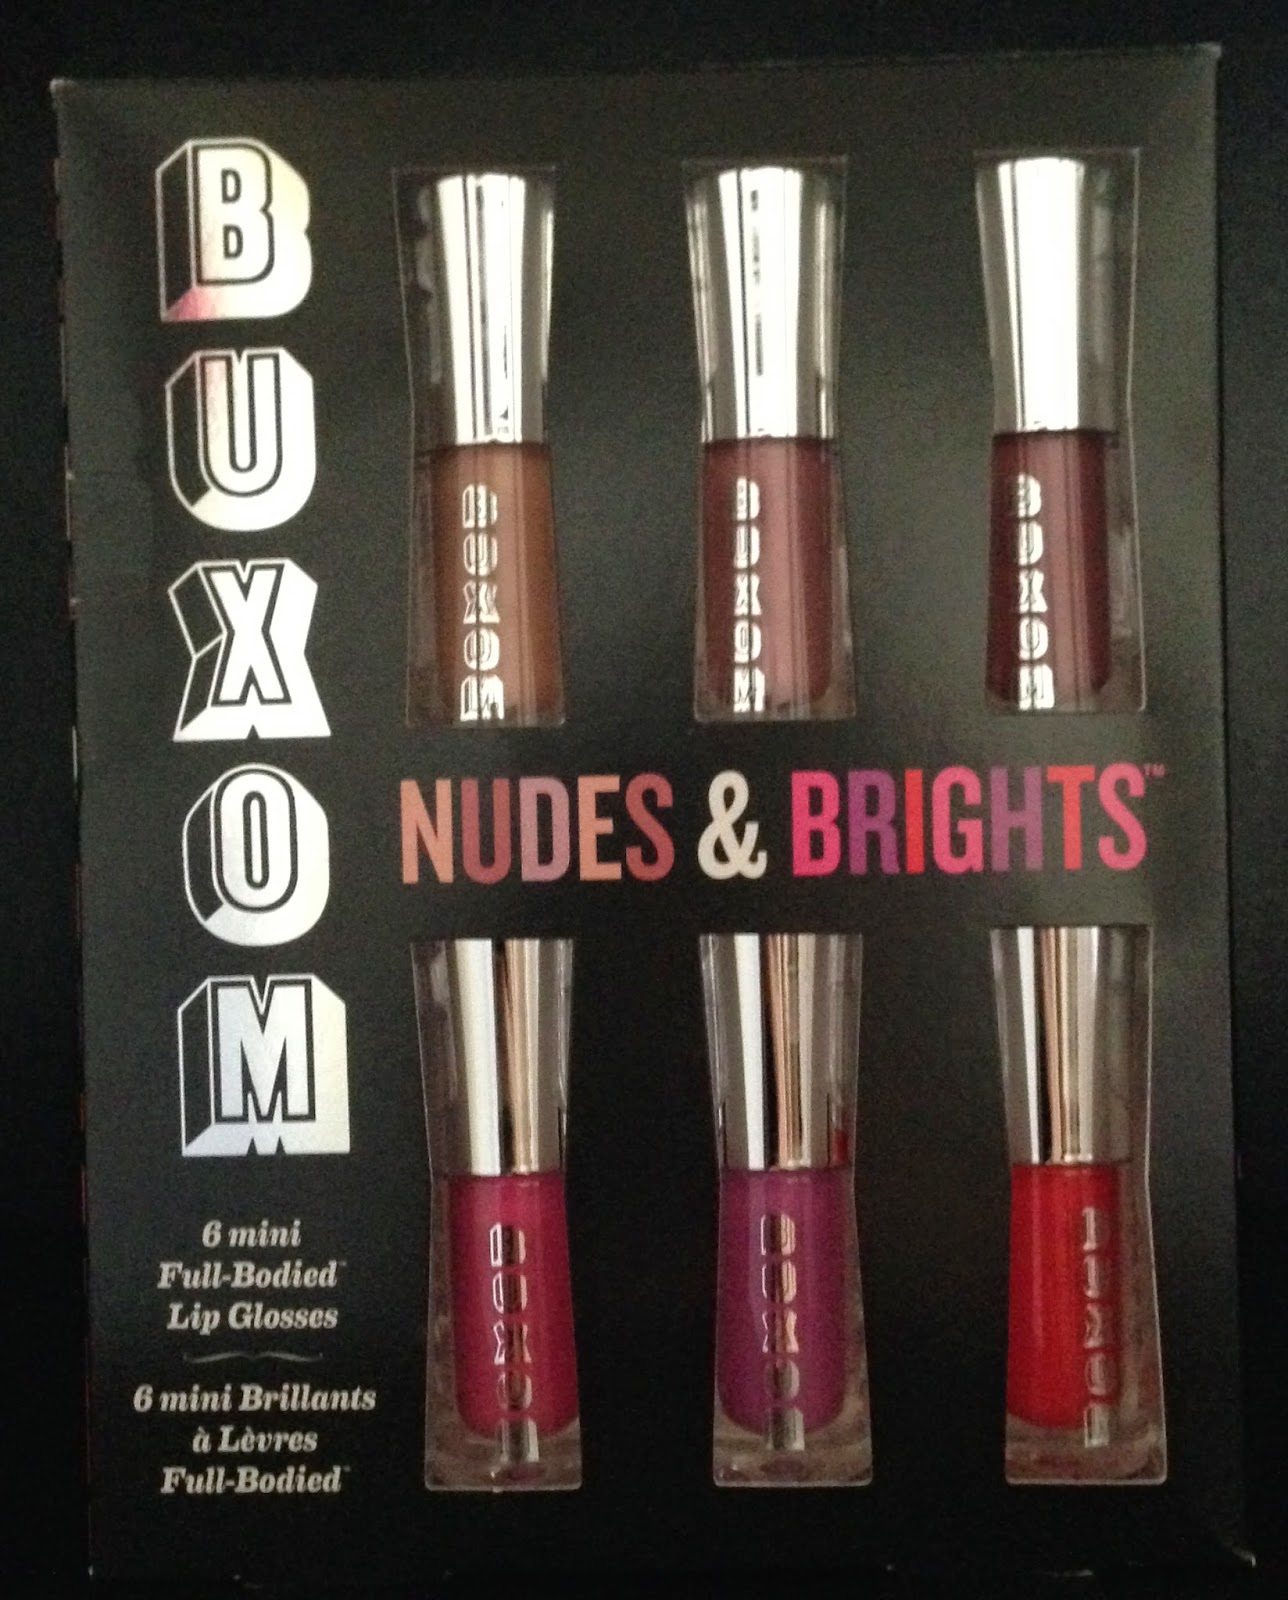
I sort of went a little crazy on Sephora's website recently and spent enough to get me to the VIB status. So yes, I spent quite a bit. One of the things that caught my eye was the Buxom Nudes and Brights lip gloss set. It was $32 with a retail value of $51. 


I've heard a lot of great things about the Buxom line and thought this was a good way to try six of their colors out without breaking the bank. Below is a little swatchy, swatchy.
From left to right: Yes You, Mwah, Dolly, Strut It, Pucker Up and Cha Cha Cha

Aren't they so pretty?! And I love the names of them. When I went to try them out on my lips, Yes You and Mwah didn't show up too well. But I'm thinking with a lipstick underneath, they'll give that perfect bit of nude you need. 


The dofa applicator is flat on both sides, so instead of having to dip the applicator back in after one use, you can flip it over and use the other side. I'm definitely pleased with this buy. They weren't too sticky, which is what I look for in a gloss. Nobody likes to rub their lips together and it feel like there's sticky glue on them. I think Cha Cha Cha is going to be a staple for me this summer. It's the perfect bright coral color. These Buxom glosses were a definite hit!

From my glossy lips to yours,
-Amanda :)

Tuesday, May 13, 2014

tarte Brazilliance Maracuja Self-Tanner

First Impression/Review


I recently bought the Tarte Brazilliance Rejuvenating Maracuja Face and Body Self-Tanner. Phew, say that 10 times fast. QVC was having a one day deal where you would get the self-tanner (11 oz - double the size as the original), mitt and self-tanning face towelette's (5) for $49.98. With shipping and handling added, the total came out to $60.95.

Originally the tanner is $39.99 for 5.5 oz (half the size of the QVC deal) and mitt. The towelette's you'd have to buy separately at $21.00 for 10.

I'm all about trying new products so I jumped at the deal. I took a shower and exfoliated the night before with Lush's Sea Salt Scrub, shaved and then used the self-tanner right before bed.

TIP: Do not apply self-tanner right after you shave because the tanner will seep into your pores and you'll have these dark dots all over your legs and that is not cute. You should wait about a couple hours before applying.

Now on to the application.
The first thing I noticed was the smell. It wasn't a gross fake tan smell, you know exactly what I'm talking about. The smell was pleasant and tolerable. The tanner comes out as a dark brown color and it does have a slight tanning guard so you can tell where you're applying it.
I did feel as though most of the tanner was being absorbed into the mitt. I did two coats of tanner to my body. I did not use the face towelette's because you have to wash your hands right after using it and I didn't want to wash off the tanner I had put on my hands. The tanner takes about 8 hours to develop so I put it on before I went to bed and off to sleep I went. 

I have white sheets so when I woke up this morning I expected some of the tanner to have gotten on my bedding but surprisingly there was none! My skin was quite brown from the color guard but I hopped in the shower and rinsed off. I was a little disappointed that after rinsing off, much of the color was gone. I put my moisturizer (I prefer a body butter) on and have gone about my morning. 

TIP: To help the longevity of your tan, always moisturize. Use a wash cloth in the shower instead of a loofa and try not to shave because you're tan will come off on the razor.

So what do I think of this product?

PROS: The application was easy, the smell was great, it didn't stain my fingernails and it didn't come off on my sheets.
CONS: The color isn't as dark as I had hoped, even after two coats, and most of the product seemed to have absorbed into the mitt when applying.

FINAL THOUGHTS: This is a good product if you're new to self-tanning or if you just want a really subtle looking tan. For the price and what I received, it was a good buy for me. If you're looking for that deep, dark tan like you just spent a week on an island this is not the product for you.

I hope this helped some of you. Remember, stay out of the sun! Skin cancer and wrinkles are not cute. Self-tanning for the win!

-Amanda :)

Monday, May 12, 2014

Sigma Makeup Brushes

Sigma Makeup Brushes
Is it worth the hype?


I was very skeptical when it came to Sigma's makeup brushes. I researched, watched videos and read reviews about their brushes and there were a lot of mixed opinions. I decided to hold off on purchasing any for the time being since I felt I didn't need anything at the time. 

2014 has come and I knew I needed new brushes. I had been watching Jaclyn Hill on YouTube for awhile and she mentioned she teamed with Sigma to create an Expert Beauty Box that included seven of her favorite brushes for $90 (retail value of $113). I decided to go ahead and buy the box in March when it launched.


My box (pictured above) arrived a week later.
The contents included:
  • F80 Flat Kabuki 
  • F86 Tapered Kabuki
  • F35 Tapered Highlighter
  • E55 Eye Shading
  • E25 Blending
  • E40 Tapered Blending
  • E30 Pencil
  • Mini E25 Blending (Free Gift with $30 purchase)
  • Card from Jaclyn Hill
I immediately took them to the sink to wash. (I use the Beautyblender Solid to clean my brushes) The Kabuki brushes washed fine, no shedding or fallout. However, when I washed the F35 Highlighter brush, it shed quite a bit. I was a little sad when that happened. The rest of the brushes had no shedding or fallout. 

I've been using these brushes for a month now and I absolutely LOVE them. Ever since that first wash with the F35 brush, it has not shed since. They work amazing. I have different makeup brushes but always grab for these. I will definitely be purchasing more. Not only do they have brushes but they also have makeup and accessories for your brushes! They have a brush glove that I really want to try too!

Basically, Sigma brushes are like Mac brushes except cheaper in price and better quality. If you're in the market for new brushes, I recommend taking a look into their collection. www.sigmabeauty.com

-Amanda :)